例如我目前的網域為one.mail.com
我某天新增了一個two.mai.com的網域
假設我同一個人同一個帳號也要收到two.mail.com的信件
不考慮寄件網域的情況下
目前查到最簡單的方式如下
1.
# vi /etc/postfix/main.cf
mydestination = $myhostname, localhost.$mydomain, localhost, $mydomain, two.mail.com
#mydestination加上two.mail.com
virtual_maps = regexp:/etc/postfix/virtual
# virtual_maps也加上regexp:/etc/postfix/virtual
2.
# vi /etc/postfix/virtual
#新增 例如 test@aaa.com.tw要能收到test@bbb.com.tw的信
#只要外部的人寄給test@bbb.com.tw就會把信轉給test@aaa.com.tw
/test@two\.mail\.com/ test@one.mail.com
3.
service postfix reload
完成!!
參考
http://ithelp.ithome.com.tw/question/10142215
2014-09-01

2014-05-08
postfix僅允許特定信箱使用群組寄信
1,定义规范等级,名称分别为local_only与local_only1,修改main.cf(注:红色的代表新增加的)
[root@mail postfix]# vi main.cf
#youshengtao 2010-10-12
smtpd_restriction_classes = local_only, local_only1
local_only = check_recipient_access hash:/etc/postfix/plugin/plugin.list,reject
local_only1 = check_sender_access hash:/etc/postfix/plugin/plugin.users,reject
smtpd_recipient_restrictions
= reject_unknown_sender_domain, reject_unknown_recipient_domain,
reject_non_fqdn_sender, reject_non_fqd
n_recipient, reject_unlisted_recipient, check_sender_access
hash:/etc/postfix/plugin/plugin.users, check_sender_access
hash:/etc/postfix/plugin/local_senders, check_recipient_access
hash:/etc/postfix/plugin/local_recipients, permit_mynetworks, permit_sasl_authenticated, rejec
t_unauth_destination, reject_non_fqdn_helo_hostname, reject_invalid_helo_hostname, check_policy_service inet:127.0.0.1:10031
2,建立相关的目录,也可以不建目录,直接放在postifx目录下面,不过,为了以后维护方便,我还是建了一个目录。
[root@mail ~]# mkdir -p /etc/postfix/plugin
[root@mail ~]# cd /etc/postfix/plugin/
[root@mail plugin]# vi local_recipients
qtyg@ourgame.com local_only1
[root@mail plugin]# vi local_senders
wanglujing@ourgame.com local_only
renlina@ourgame.com local_only
caiyanyan@ourgame.com local_only
qinwen@ourgame.com local_only
shiwanting@ourgame.com local_only
[root@mail plugin]# vi plugin.list
qtyg@ourgame.com OK
[root@mail npc]# vi plugin.users
wanglujing@ourgame.com OK
renlina@ourgame.com OK
caiyanyan@ourgame.com OK
qinwen@ourgame.com OK
shiwanting@ourgame.com OK
3,使用postmap将下列的文件转换成postfix可直接查询的格式。
postmap hash:/etc/postfix/plugin/plugin.list
postmap hash:/etc/postfix/plugin/plugin.users
postmap hash:/etc/postfix/plugin/local_senders
postmap hash:/etc/postfix/plugin/local_recipients
4,重载postfix后,邮件服务器正常工作,实现了我们需要的功能。
[root@mail npc]# service postfix reload
重新载入postfix:[确定]
參考來源:
http://chlotte.blog.51cto.com/318402/404764/
2014-03-24
IIS 8 新增FTP後無法連線
連線時出現錯誤
530 Valid hostname is expected.
需在User Name內輸入 domain|user 才可正常連線
例如test.domain.com|administrator
如下圖將主機名稱拿掉後即可直接輸入User Name連線

530 Valid hostname is expected.
需在User Name內輸入 domain|user 才可正常連線
例如test.domain.com|administrator
如下圖將主機名稱拿掉後即可直接輸入User Name連線
2014-03-23
Esxi錯誤:There is no more space for virtual disk
Esxi上出現此訊息
There is no more space for virtual disk XXXXXXX-000***.vmdk. You might be able to continue this session by freeing disk space on the relevant volume, and clicking Retry. Click Cancel to terminate this session.

訊息只告知沒有空間了,該釋放一些空間出來,但沒有說可以從哪裡釋放,網路上的資訊其實沒有很多。但問題是這顆硬碟有500GB,我的伺服器也只切給它200GB啊,怎麼會沒有空間?
最後查到是snapshop造成的問題
http://vaemon.com/article/910.html
http://www.ithome.com.tw/node/74422
我的snapshot檔案已經成長到把剩餘的空間幾乎佔滿,導致虛擬機開不起來。
最後不得已只好用snapshot manager把快照檔刪了
刪除時也有遇到錯誤
刪除進度跑到99%時停滯了1個多小時,不知道還要等多久
等不下去之後上網搜尋了一下
https://communities.vmware.com/thread/403804
最後連線進去下指令
/sbin/services.sh restart
終於恢復正常
There is no more space for virtual disk XXXXXXX-000***.vmdk. You might be able to continue this session by freeing disk space on the relevant volume, and clicking Retry. Click Cancel to terminate this session.
訊息只告知沒有空間了,該釋放一些空間出來,但沒有說可以從哪裡釋放,網路上的資訊其實沒有很多。但問題是這顆硬碟有500GB,我的伺服器也只切給它200GB啊,怎麼會沒有空間?
最後查到是snapshop造成的問題
http://vaemon.com/article/910.html
http://www.ithome.com.tw/node/74422
我的snapshot檔案已經成長到把剩餘的空間幾乎佔滿,導致虛擬機開不起來。
最後不得已只好用snapshot manager把快照檔刪了
刪除時也有遇到錯誤
刪除進度跑到99%時停滯了1個多小時,不知道還要等多久
等不下去之後上網搜尋了一下
https://communities.vmware.com/thread/403804
最後連線進去下指令
/sbin/services.sh restart
終於恢復正常
2014-03-11
AIX內擴充空間
AIX以擴充/dev/oraclelv為例


1.4 最後用lslv –l oraclelv了解下oraclelv已佔用了哪幾個物理卷

lspv -l hdisk*了解下各個物理卷的使用情況


lsvg -p devdbvg了解下devdbvg卷組包括哪些物理卷

2、 增加文件系統空間
執行成功後會顯示command:OK
1、
在擴增文件系統以前,要先理清楚以下幾點:
1.1 用df -g命令查看該文件系統還剩多少空間,對應在哪個邏輯卷LV下(例/oracle在oraclelv邏輯卷下)
1.1 用df -g命令查看該文件系統還剩多少空間,對應在哪個邏輯卷LV下(例/oracle在oraclelv邏輯卷下)


1.2 用lslv oraclelv 查看該邏輯卷信息,主要看MAX LPs、LPs、PPs,計算擴增後的文件系統大小不要超過MAX LPs,如果MAX LPs、LPs、PPs已經相等,就要先擴增邏輯卷oraclelv了。再注意一下是jfs2還是jfs類型,確定選那個擴增命令。

1.4 最後用lslv –l oraclelv了解下oraclelv已佔用了哪幾個物理卷
lspv -l hdisk*了解下各個物理卷的使用情況
lsvg -p devdbvg了解下devdbvg卷組包括哪些物理卷
2、 增加文件系統空間
2.1 此例中先改變oraclelv的MAX LPs的大小,由原來1600改為3200
命令smitty chlv→change a logical volume
Logieal volume name [oraclelv] 選擇要擴增的邏輯卷
MAXIMUM NUMBER of LOGICAL PARTITIONS [2048] 由1024改為2048

命令smitty chlv→change a logical volume
Logieal volume name [oraclelv] 選擇要擴增的邏輯卷
MAXIMUM NUMBER of LOGICAL PARTITIONS [2048] 由1024改為2048
執行成功後會顯示command:OK
此時再用lslv oraclelv可以看到MAX LPs已经改变为2048。
注:此時在改LV的MAX LPs时,無法選擇物理卷,在創建LV时可以選擇。
2.2 更改文件系統/oracle的大小
smitty chjfs2
選擇/oracle

Unit size 項可以選Gigabytes,以GB計算增加量
Number of units輸入擴充後的最終大小

命令執行完顯示后的最终大小
命令執行成功會顯示Command: OK
2.3、退出後查看
lsvg devdbvg FREE PPs減小
lslv oraclelv LPs和PPs數都相應增加了
df -g查看/oracle的空間已經增加了50G
lslv –l oraclelv 查看為oraclelv增加的邏輯卷
參考:
http://www.aixchina.net/club/redirect.php?goto=findpost&ptid=6347&pid=65483
smitty chjfs2
選擇/oracle
Unit size 項可以選Gigabytes,以GB計算增加量
Number of units輸入擴充後的最終大小
命令執行完顯示后的最终大小
命令執行成功會顯示Command: OK
2.3、退出後查看
lsvg devdbvg FREE PPs減小
lslv oraclelv LPs和PPs數都相應增加了
df -g查看/oracle的空間已經增加了50G
lslv –l oraclelv 查看為oraclelv增加的邏輯卷
參考:
http://www.aixchina.net/club/redirect.php?goto=findpost&ptid=6347&pid=65483
2013-11-29
Windows Raid1 鏡像方法
1. 放入一顆相同容量之硬碟後,於電腦/右鍵/管理/存放裝置/磁碟管理中以滑鼠右鍵點選目前已有資料之硬碟選擇新增鏡像

2. 確認欲新增之鏡像正確後點選新增鏡像

3. 點選是

4. 稍後一下即新增鏡像完成

5. 當某天鏡像內某顆硬碟故障或錯誤會出現以下圖示

6. 關機將錯誤之硬碟卸下或修復後接上或換上相同容量之新硬碟

7. 點選滑鼠右鍵選擇移除鏡像將原先顯示遺失之鏡像硬碟移除

8. 確認選擇的是遺失之磁碟後點選移除鏡像

9. 點選滑鼠右鍵選擇轉換成基本磁碟將新接上之硬碟轉換

10. 轉換完成後接著按照步驟1重新執行鏡像即可
2013-06-28
CentOS新增網卡及指定對外網卡
CentOS新增網卡
1. 設定
# yum install system-config-network-tui
a. Network Configuration
# system-config-network-tui,選擇『Network Configuration』
b. Device Configuration

c. New Device

d. Ethernet

e. Name & Device
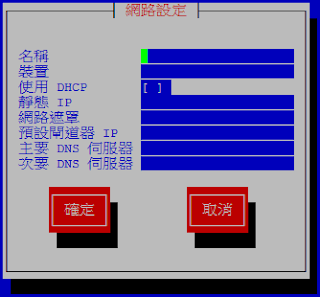
3. 完成確認
a. 確認裝置已新增並儲存離開

b. # vi /etc/sysconfig/network-scripts/ifcfg-eth1
修改 ONBOOT=yes
開機時才會自動將這張網卡啟動
指定對外網卡方式
方法1
# vi /etc/sysconfig/network
加入GATEWAYDEV=eth0 (你要對外的那一張網卡)
這是將默認gateway設定用對外網卡
# route
就可以看是不是設定正確走你想要的route出去
方法2
# vi /etc/sysconfig/network-scripts/ifcfg-eth1 (內部使用之網卡)
將gateway刪掉 就出不去啦 就會走唯一可以到外部的那張網卡
參考:
http://www.dotblogs.com.tw/ghoseliang/archive/2012/09/26/75062.aspx
http://www.hksilicon.com/kb/articles/22317/Centos
http://linux.vbird.org/linux_server/0130internet_connect.php
1. 設定
# yum install system-config-network-tui
a. Network Configuration
# system-config-network-tui,選擇『Network Configuration』
b. Device Configuration


c. New Device


d. Ethernet


e. Name & Device

3. 完成確認
a. 確認裝置已新增並儲存離開


b. # vi /etc/sysconfig/network-scripts/ifcfg-eth1
修改 ONBOOT=yes
開機時才會自動將這張網卡啟動
指定對外網卡方式
方法1
# vi /etc/sysconfig/network
加入GATEWAYDEV=eth0 (你要對外的那一張網卡)
這是將默認gateway設定用對外網卡
# route
就可以看是不是設定正確走你想要的route出去
方法2
# vi /etc/sysconfig/network-scripts/ifcfg-eth1 (內部使用之網卡)
將gateway刪掉 就出不去啦 就會走唯一可以到外部的那張網卡
參考:
http://www.dotblogs.com.tw/ghoseliang/archive/2012/09/26/75062.aspx
http://www.hksilicon.com/kb/articles/22317/Centos
http://linux.vbird.org/linux_server/0130internet_connect.php
2013-06-05
CentOS 6.4 使用Maildir建置流程 Postfix+dovecot+MailScanner+Clamav+Spamassassin
關閉SELINUX
# vi /etc/sysconfig/selinux
SELINUX=enforcing
改成
SELINUX=disabled
安裝RPMforge
# rpm -Uvh http://pkgs.repoforge.org/rpmforge-release/rpmforge-release-0.5.3-1.el6.rf.x86_64.rpm
RPMforge是Dag, Dries和其他的打包者合作的套件庫,提供CentOS超過4000種以上的套件
更新套件
# yum -y update
網路校時
# yum -y install ntp #安裝NTP
# /usr/sbin/ntpdate tock.stdtime.gov.tw #執行網路校時針對 tock.stdtime.gov.tw
# /usr/sbin/hwclock -w #將時間寫入BIOS
# vi /etc/crontab
加入 10 5 * * * root /usr/sbin/ntpdate tock.stdtime.gov.tw && /sbin/hwclock –w
#排程自動校時每天5:10校時
安裝Postfix
1.移除sendmail安裝postfix
# /etc/init.d/sendmail stop #停用sendmail
# yum install postfix #安裝postfix
# rpm -e sendmail #移除sendmail
# service postfix start #啟動postfix服務
2. postfix設定
設定檔位置 /etc/postfix/main.cf設定 postfix 可接收外部連線
vi /etc/postfix/main.cf
將inet_interfaces = localhost #註解
改成
inet_interfaces = all
mydestination = $myhostname, localhost.$mydomain, localhost, $mydomain
mydomain = example.com.tw
myhostname = mail.example.com.tw
home_mailbox = Maildir/
# service postfix restart #重新啟動postfix服務
3. 測試 postfix(smtp)
# telnet localhost smtp
Trying 127.0.0.1...
Connected to localhost.localdomain (127.0.0.1).
Escape character is '^]'.
220 mail.acme.local ESMTP Postfix
ehlo localhost
250-mail.acme.local
250-PIPELINING
250-SIZE 10240000
250-VRFY
250-ETRN
250-ENHANCEDSTATUSCODES
250-8BITMIME
250 DSN
mail from:<johndoe>
250 2.1.0 Ok
rcpt to:<johndoe>
250 2.1.5 Ok
data
354 End data with <CR><LF>.<CR><LF>
test
.
250 2.0.0 Ok: queued as 9729067C17
quit
221 2.0.0 Bye
Connection closed by foreign host.
[root@mail ~]#
看信件內容:
To check if the mail indeed exists
# cd /home/johndoe/Maildir/new
[root@mail new]# ls
1185669817.Vfd00I18012M795756.mail.acme.local
[root@mail new]# cat 1185669817.Vfd00I18012M795756.mail.acme.local
Don’t worry, you don’t have to type in the whole filename above. Just type in the first few characters say 118 then press Tab to activate automatic completion.
From johndoe@mail.acme.local Thu Feb 22 21:48:28 2007
Return-Path: <johndoe@mail.acme.local>
X-Original-To: johndoe
Delivered-To: johndoe@mail.acme.local
Received: from localhost.localdomain (localhost.localdomain [127.0.0.1])
by mail.acme.local (Postfix) with SMTP id 9729067C17
for <johndoe>; Thu, 22 Feb 2007 21:48:26 -0500 (EST)
Message-Id: <20070222134827.9729067C17@mail.acme.local>
Date: Thu, 22 Feb 2007 21:48:26 -0500 (EST)
From: johndoe@mail.acme.local
To: undisclosed-recipients:;
test
[root@mail mail]#
4. 設定postfix SMTP 驗證
安裝 cyrus-sasl-md5 cyrus-sasl-plain cyrus-sasl 套件
yum install cyrus-sasl-md5 cyrus-sasl-plain cyrus-sasl -y
vi /etc/dovecot/conf.d/10-master.conf
service auth {
unix_listener /var/spool/postfix/private/auth {
mode = 0666
user = postfix
group = postdrop
}
}
vi /etc/dovecot/conf.d/10-auth.conf
auth_mechanisms = plain login
vi /etc/postfix/main.cf
find the keys below and change its values as follows or add it at the bottom of the file if the key (the word before the = sign) cannot be found.
mynetworks = 127.0.0.0/8
smtpd_sasl_type = dovecot
smtpd_sasl_path = private/auth
smtpd_sasl_auth_enable = yes
smtpd_recipient_restrictions = permit_mynetworks,
permit_sasl_authenticated,
reject_unauth_destination
broken_sasl_auth_clients = yes
smtpd_sasl_security_options = noanonymous
chkconfig saslauthd on #設定開機啟動
service saslauthd restart #啟動saslauthd服務
利用telnet 測式smtp認證功能是否生效(要有出現LOGIN PLAIN才算)
[root@mail ~]# telnet mail smtp
Trying 192.168.0.1...
Connected to mail.acme.local (192.168.0.1).
Escape character is '^]'.
220 mail.acme.local ESMTP Postfix
ehlo localhost
250-mail.acme.local
250-PIPELINING
250-SIZE 10240000
250-VRFY
250-ETRN
250-AUTH LOGIN PLAIN
250-AUTH=LOGIN PLAIN
250-ENHANCEDSTATUSCODES
250-8BITMIME
250 DSN
Note the new 250-AUTH lines. See the old SMTP Telnet Test.
mail from:<johndoe>
250 2.1.0 Ok
rcpt to:<test@example.com>
554 5.7.1 <test@example.com>: Relay access denied
It works, now to check if we can send it after authenticating.
auth plain AGpvaG5kb2UAcGFzc3dvcmQ=
235 2.0.0 Authentication successful
rcpt to:<test@example.com>
250 2.1.5 Ok
quit
221 2.0.0 Bye
Connection closed by foreign host.
[root@mail ~]#
安裝dovecot pop3服務
yum install dovecot #安裝dovecot
vi /etc/dovecot/dovecot.conf
protocols = imap imaps pop3 pop3s
改成
protocols = pop3 imap lmtp
vi /etc/dovecot/conf.d/10-auth.conf
disable_plaintext_auth = no
(檢查看看outlook setting
disable_plaintext_auth = yes <--- 使用SSL/TLS
disable plaintext_auth = no <--- 跟上面的相反)
vi /etc/dovecot/conf.d/10-mail.conf
#mail_location = mbox:~/mail:INBOX=/var/mail/%u (不用mbox)
改成
mail_location = maildir:/var/spool/maildir/%u
vi /etc/dovecot/conf.d/20-pop3.conf
pop3_uidl_format = %08Xu%08Xv
pop3_client_workarounds = outlook-no-nuls oe-ns-eoh
設定啟動 dovecot 服務,並設定開機自動啟動
chkconfig dovecot on
service dovecot start
測試 Dovecot
Sample dovecot session. Replace johndoe and password with any valid user name and password.
[root@mail ~]# telnet localhost pop3
+OK dovecot ready.
user johndoe
+OK
pass password
+OK Logged in.
list
+OK 1 messages:
1 622
.
retr 1
+OK 622 octets
Return-Path: <johndoe@mail.acme.local>
X-Original-To: johndoe
Delivered-To: johndoe@mail.acme.local
Received: from localhost.localdomain (localhost.localdomain [127.0.0.1])
by mail.acme.local (Postfix) with SMTP id 9729067C17
for <johndoe>; Thu, 22 Feb 2007 09:06:37 -0500 (EST)
Message-Id: <20070222140640.9729067C17@mail.acme.local>
Date: Thu, 22 Feb 2007 09:06:37 -0500 (EST)
From: johndoe@mail.acme.local
To: undisclosed-recipients:;
X-IMAPbase: 1172153557 1
Status: O
X-UID: 1
Content-Length: 5
X-Keywords:
test
.
quit
+OK Logging out.
Connection closed by foreign host.
[root@mail ~]#
防火牆安裝
yum install system-config-firewall
掃毒clamd及過濾廣告信軟體spamassassin
1. yum install clamd spamassassin
2. 啟動 clamd
freshclam
service clamd start
chkconfig clamd on
3. 啟用 SpamAssassin AWL Plugin
vi /etc/mail/spamassassin/v310.pre
取消這行註解loadplugin Mail::SpamAssassin::Plugin::AWL讓 SpamAssassin 載入 AWL (Auto-White-List) Plugin
(因應 MailScanner.conf 的 use_auto_whitelist 參數無效問題)
安裝MailScanner
1. 安裝 MailScanner
yum install perl-Archive-Zip perl-DBI perl-DBD-SQLite perl-Filesys-Df perl-Net-CIDR perl-OLE-Storage_Lite perl-Sys-Hostname-Long perl-Sys-SigAction perl-MIME-tools gcc make rpm-build -y
wget http://www.mailscanner.info/files/4/rpm/MailScanner-4.84.5-3.rpm.tar.gz
tar zxf MailScanner-*
cd MailScanner-*
./install.sh
2. MailScanner 基本設置
vi /etc/MailScanner/MailScanner.conf
%org-name% = www.example.com.tw
Run As User = postfix
Run As Group = postdrop
Incoming Queue Dir = /var/spool/postfix/hold
Outgoing Queue Dir = /var/spool/postfix/incoming
MTA = postfix
Incoming Work Group = clam
Incoming Work Permissions = 0640
Virus Scanners = clamd
Clamd Socket = /var/run/clamav/clamd.sock
SpamAssassin User State Dir = /var/spool/MailScanner/spamassassin
High Scoring Spam Actions = deliver
vi /etc/MailScanner/virus.scanners.conf
clamd /bin/false /usr
vi /etc/MailScanner/spam.assassin.prefs.conf
bayes_ignore_header X- www.example.com.tw -MailScanner
bayes_ignore_header X- www.example.com.tw -MailScanner-SpamCheck
bayes_ignore_header X- www.example.com.tw -MailScanner-SpamScore
bayes_ignore_header X- www.example.com.tw -MailScanner-Information
envelope_sender_header X- www.example.com.tw -MailScanner-From
#use_auto_whitelist 0
cd /var/spool/MailScanner
mkdir spamassassin
chown -R postfix:clam *
chmod -R 750 *
vi /etc/postfix/main.cf
header_checks = regexp:/etc/postfix/header_checks
echo "/^Received:/ HOLD" >> /etc/postfix/header_checks
vi $(which MailScanner)
#!/usr/bin/perl -I/usr/lib/MailScanner -U
3. 修改權限
chown postfix.postdrop /var/spool/MailScanner/incoming chown postfix.postdrop /var/spool/MailScanner/quarantine
4. 檢查 MailScanner 設置是否正確
MailScanner --lint
5. 啟動 MailScanner
service postfix stop
chkconfig postfix off
service MailScanner start
chkconfig MailScanner on
參考:
http://presitw.blogspot.tw/2012/05/centos-62-mail-postfixdovecotmailscanne.html
# vi /etc/sysconfig/selinux
SELINUX=enforcing
改成
SELINUX=disabled
安裝RPMforge
# rpm -Uvh http://pkgs.repoforge.org/rpmforge-release/rpmforge-release-0.5.3-1.el6.rf.x86_64.rpm
RPMforge是Dag, Dries和其他的打包者合作的套件庫,提供CentOS超過4000種以上的套件
更新套件
# yum -y update
網路校時
# yum -y install ntp #安裝NTP
# /usr/sbin/ntpdate tock.stdtime.gov.tw #執行網路校時針對 tock.stdtime.gov.tw
# /usr/sbin/hwclock -w #將時間寫入BIOS
# vi /etc/crontab
加入 10 5 * * * root /usr/sbin/ntpdate tock.stdtime.gov.tw && /sbin/hwclock –w
#排程自動校時每天5:10校時
安裝Postfix
1.移除sendmail安裝postfix
# /etc/init.d/sendmail stop #停用sendmail
# yum install postfix #安裝postfix
# rpm -e sendmail #移除sendmail
# service postfix start #啟動postfix服務
2. postfix設定
設定檔位置 /etc/postfix/main.cf設定 postfix 可接收外部連線
vi /etc/postfix/main.cf
將inet_interfaces = localhost #註解
改成
inet_interfaces = all
mydestination = $myhostname, localhost.$mydomain, localhost, $mydomain
mydomain = example.com.tw
myhostname = mail.example.com.tw
home_mailbox = Maildir/
# service postfix restart #重新啟動postfix服務
3. 測試 postfix(smtp)
# telnet localhost smtp
Trying 127.0.0.1...
Connected to localhost.localdomain (127.0.0.1).
Escape character is '^]'.
220 mail.acme.local ESMTP Postfix
ehlo localhost
250-mail.acme.local
250-PIPELINING
250-SIZE 10240000
250-VRFY
250-ETRN
250-ENHANCEDSTATUSCODES
250-8BITMIME
250 DSN
mail from:<johndoe>
250 2.1.0 Ok
rcpt to:<johndoe>
250 2.1.5 Ok
data
354 End data with <CR><LF>.<CR><LF>
test
.
250 2.0.0 Ok: queued as 9729067C17
quit
221 2.0.0 Bye
Connection closed by foreign host.
[root@mail ~]#
看信件內容:
To check if the mail indeed exists
# cd /home/johndoe/Maildir/new
[root@mail new]# ls
1185669817.Vfd00I18012M795756.mail.acme.local
[root@mail new]# cat 1185669817.Vfd00I18012M795756.mail.acme.local
Don’t worry, you don’t have to type in the whole filename above. Just type in the first few characters say 118 then press Tab to activate automatic completion.
From johndoe@mail.acme.local Thu Feb 22 21:48:28 2007
Return-Path: <johndoe@mail.acme.local>
X-Original-To: johndoe
Delivered-To: johndoe@mail.acme.local
Received: from localhost.localdomain (localhost.localdomain [127.0.0.1])
by mail.acme.local (Postfix) with SMTP id 9729067C17
for <johndoe>; Thu, 22 Feb 2007 21:48:26 -0500 (EST)
Message-Id: <20070222134827.9729067C17@mail.acme.local>
Date: Thu, 22 Feb 2007 21:48:26 -0500 (EST)
From: johndoe@mail.acme.local
To: undisclosed-recipients:;
test
[root@mail mail]#
4. 設定postfix SMTP 驗證
安裝 cyrus-sasl-md5 cyrus-sasl-plain cyrus-sasl 套件
yum install cyrus-sasl-md5 cyrus-sasl-plain cyrus-sasl -y
vi /etc/dovecot/conf.d/10-master.conf
service auth {
unix_listener /var/spool/postfix/private/auth {
mode = 0666
user = postfix
group = postdrop
}
}
vi /etc/dovecot/conf.d/10-auth.conf
auth_mechanisms = plain login
vi /etc/postfix/main.cf
find the keys below and change its values as follows or add it at the bottom of the file if the key (the word before the = sign) cannot be found.
mynetworks = 127.0.0.0/8
smtpd_sasl_type = dovecot
smtpd_sasl_path = private/auth
smtpd_sasl_auth_enable = yes
smtpd_recipient_restrictions = permit_mynetworks,
permit_sasl_authenticated,
reject_unauth_destination
broken_sasl_auth_clients = yes
smtpd_sasl_security_options = noanonymous
chkconfig saslauthd on #設定開機啟動
service saslauthd restart #啟動saslauthd服務
利用telnet 測式smtp認證功能是否生效(要有出現LOGIN PLAIN才算)
[root@mail ~]# telnet mail smtp
Trying 192.168.0.1...
Connected to mail.acme.local (192.168.0.1).
Escape character is '^]'.
220 mail.acme.local ESMTP Postfix
ehlo localhost
250-mail.acme.local
250-PIPELINING
250-SIZE 10240000
250-VRFY
250-ETRN
250-AUTH LOGIN PLAIN
250-AUTH=LOGIN PLAIN
250-ENHANCEDSTATUSCODES
250-8BITMIME
250 DSN
Note the new 250-AUTH lines. See the old SMTP Telnet Test.
mail from:<johndoe>
250 2.1.0 Ok
rcpt to:<test@example.com>
554 5.7.1 <test@example.com>: Relay access denied
It works, now to check if we can send it after authenticating.
auth plain AGpvaG5kb2UAcGFzc3dvcmQ=
235 2.0.0 Authentication successful
rcpt to:<test@example.com>
250 2.1.5 Ok
quit
221 2.0.0 Bye
Connection closed by foreign host.
[root@mail ~]#
安裝dovecot pop3服務
yum install dovecot #安裝dovecot
vi /etc/dovecot/dovecot.conf
protocols = imap imaps pop3 pop3s
改成
protocols = pop3 imap lmtp
vi /etc/dovecot/conf.d/10-auth.conf
disable_plaintext_auth = no
(檢查看看outlook setting
disable_plaintext_auth = yes <--- 使用SSL/TLS
disable plaintext_auth = no <--- 跟上面的相反)
vi /etc/dovecot/conf.d/10-mail.conf
#mail_location = mbox:~/mail:INBOX=/var/mail/%u (不用mbox)
改成
mail_location = maildir:/var/spool/maildir/%u
vi /etc/dovecot/conf.d/20-pop3.conf
pop3_uidl_format = %08Xu%08Xv
pop3_client_workarounds = outlook-no-nuls oe-ns-eoh
設定啟動 dovecot 服務,並設定開機自動啟動
chkconfig dovecot on
service dovecot start
測試 Dovecot
Sample dovecot session. Replace johndoe and password with any valid user name and password.
[root@mail ~]# telnet localhost pop3
+OK dovecot ready.
user johndoe
+OK
pass password
+OK Logged in.
list
+OK 1 messages:
1 622
.
retr 1
+OK 622 octets
Return-Path: <johndoe@mail.acme.local>
X-Original-To: johndoe
Delivered-To: johndoe@mail.acme.local
Received: from localhost.localdomain (localhost.localdomain [127.0.0.1])
by mail.acme.local (Postfix) with SMTP id 9729067C17
for <johndoe>; Thu, 22 Feb 2007 09:06:37 -0500 (EST)
Message-Id: <20070222140640.9729067C17@mail.acme.local>
Date: Thu, 22 Feb 2007 09:06:37 -0500 (EST)
From: johndoe@mail.acme.local
To: undisclosed-recipients:;
X-IMAPbase: 1172153557 1
Status: O
X-UID: 1
Content-Length: 5
X-Keywords:
test
.
quit
+OK Logging out.
Connection closed by foreign host.
[root@mail ~]#
防火牆安裝
yum install system-config-firewall
掃毒clamd及過濾廣告信軟體spamassassin
1. yum install clamd spamassassin
2. 啟動 clamd
freshclam
service clamd start
chkconfig clamd on
3. 啟用 SpamAssassin AWL Plugin
vi /etc/mail/spamassassin/v310.pre
取消這行註解loadplugin Mail::SpamAssassin::Plugin::AWL讓 SpamAssassin 載入 AWL (Auto-White-List) Plugin
(因應 MailScanner.conf 的 use_auto_whitelist 參數無效問題)
安裝MailScanner
1. 安裝 MailScanner
yum install perl-Archive-Zip perl-DBI perl-DBD-SQLite perl-Filesys-Df perl-Net-CIDR perl-OLE-Storage_Lite perl-Sys-Hostname-Long perl-Sys-SigAction perl-MIME-tools gcc make rpm-build -y
wget http://www.mailscanner.info/files/4/rpm/MailScanner-4.84.5-3.rpm.tar.gz
tar zxf MailScanner-*
cd MailScanner-*
./install.sh
2. MailScanner 基本設置
vi /etc/MailScanner/MailScanner.conf
%org-name% = www.example.com.tw
Run As User = postfix
Run As Group = postdrop
Incoming Queue Dir = /var/spool/postfix/hold
Outgoing Queue Dir = /var/spool/postfix/incoming
MTA = postfix
Incoming Work Group = clam
Incoming Work Permissions = 0640
Virus Scanners = clamd
Clamd Socket = /var/run/clamav/clamd.sock
SpamAssassin User State Dir = /var/spool/MailScanner/spamassassin
High Scoring Spam Actions = deliver
vi /etc/MailScanner/virus.scanners.conf
clamd /bin/false /usr
vi /etc/MailScanner/spam.assassin.prefs.conf
bayes_ignore_header X- www.example.com.tw -MailScanner
bayes_ignore_header X- www.example.com.tw -MailScanner-SpamCheck
bayes_ignore_header X- www.example.com.tw -MailScanner-SpamScore
bayes_ignore_header X- www.example.com.tw -MailScanner-Information
envelope_sender_header X- www.example.com.tw -MailScanner-From
#use_auto_whitelist 0
cd /var/spool/MailScanner
mkdir spamassassin
chown -R postfix:clam *
chmod -R 750 *
vi /etc/postfix/main.cf
header_checks = regexp:/etc/postfix/header_checks
echo "/^Received:/ HOLD" >> /etc/postfix/header_checks
vi $(which MailScanner)
#!/usr/bin/perl -I/usr/lib/MailScanner -U
3. 修改權限
chown postfix.postdrop /var/spool/MailScanner/incoming chown postfix.postdrop /var/spool/MailScanner/quarantine
4. 檢查 MailScanner 設置是否正確
MailScanner --lint
5. 啟動 MailScanner
service postfix stop
chkconfig postfix off
service MailScanner start
chkconfig MailScanner on
參考:
http://presitw.blogspot.tw/2012/05/centos-62-mail-postfixdovecotmailscanne.html
訂閱:
文章 (Atom)